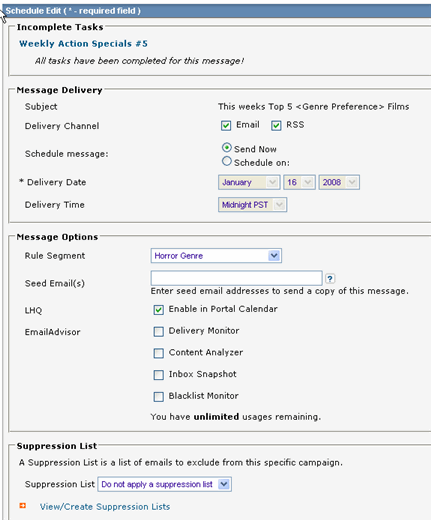
After you have created your message and run tests to make sure there are no problems, you can schedule the message for delivery to your entire mailing list.
To schedule your message for delivery
1. In the left navigation bar, click View Messages.

2. Click the Actions box for the message you want to deliver, and then select Schedule.
3. Click the Go button for your message.
4. In the Message Delivery section, choose one or both delivery channels (Email or RSS).
5. To schedule your message, do one of the following:
6. To apply a segment , in the Messsage Options section, click the Rule Segment box, and then select the segment you want.
7. To take advantage of seedbox monitoring, type one or more seed email addresses in the Seed Email(s) box.
8. To cause your message to appear in the Lyris HQ portal calendar, select Enable in Portal Calendar.
9. To take advantage of one more Email Test features, choose the feature(s) you want in the Email Testsection.
10. To apply a Suppression list, in the Suppression List section, click the Suppression List box, and then select the list you want.

11. When you are finished, click Save.
Note
![]() A
segment is useful if you want to limit your mailing to certain list members. The segment can be based on
demographic information (for example, a certain age group) or clickthru history (for example, you can limit your message
to only members who have answered a previous message).
A
segment is useful if you want to limit your mailing to certain list members. The segment can be based on
demographic information (for example, a certain age group) or clickthru history (for example, you can limit your message
to only members who have answered a previous message).