
ListManager sends automated messages when subscribers join, leave, or confirm their memberships.
Although the standard automated messages ListManager sends are adequate, you will likely want to create and use automated messages that are more informative and better reflect the character of your organization.
Customizing automated messages requires that you:
1. Create Document Content, or the message you want to send.
2. Create a Document Association, specifying under what circumstances the document should be sent.
Step A: Create Document Content
1. In the left Navigation bar, click Utilities, point to Automated Messages, and then click Document Content.
2. Click Create From Template.
3. Edit the content as you would any other content. See Creating Content for more information about editing content.
4. Click Save to save your new document content.
Step B: Create a Document Association
1. In the left Navigation bar, click Utilities, point to Automated Messages, and then click Document Association.
2. Click Create New.
3. Click the box next to Message Type, and then select the type you want. For example, if you are creating a confirmation automated message, select "List Confirm Document" as the message type.
4. Choose the Document you want.
5. In the Is Defaultsection, select yes.
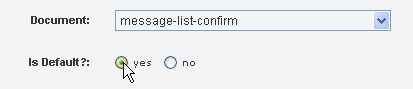
6. Click Save.
  |