Getting Your Opt-In Form Started
1. Click Create Opt-In Form.

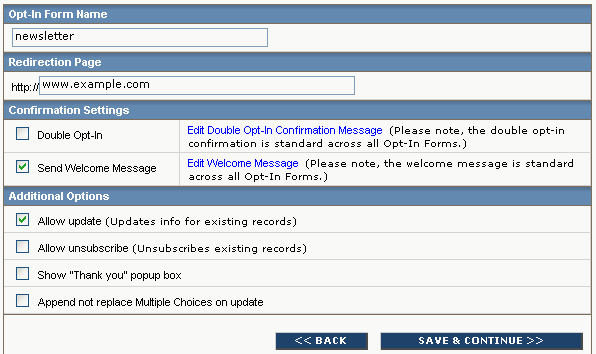
2. Type a name in the Opt-In Form Name box.

After your customer submits the form, they are sent to the Redirection page.
3. In the Redirection Page box, type the URL for the page you want to send your customer to.
A double opt-in confirmation requires your customer to respond to an automatically-sent email before they are added to the mailing list. This gives them verification of their registration and protects you from SPAM complaints.
The Welcome message goes out to your customer as soon as they join the mailing list. It offers instant customer recognition upon sign-in and reassures the customer they signed in correctly.
4. Under Confirmation Settings, click the Double Opt-In and/or Send Welcome Messagecheck boxes. To edit these messages, click the Edit command for the message you want to change. The steps are the usual ones for creating a message.
5. Under Additional Options, select one or more of the following.
Allow update: Uses the opt-in information to update an existing record if there is one, instead of creating a new one. It is based on the email address only.
Allow unsubscribe: Unsubscribes existing records.
Show “Thank you” pop up: A small pop-up window displays that says thank you for opting in.
Append not replace multiple selections on update: Allows you to append values to a multiple select form rather than replace the value when the user updates their profile.
6. Click SAVE & CONTINUE.
Choosing Demographics
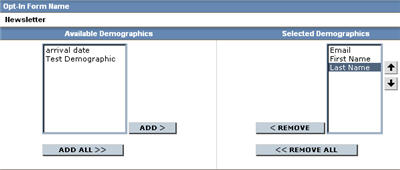
1. Under Available Demographics, click a demographic that you want your customer to fill out, and then click ADD.
2. Repeat step 7 until all the demographics you want have been added.

3. Click SAVE & NEXT.
Making Demographics Required
1. To make demographics required, select their check boxes under Required.

2. Click SAVE & CONTINUE.
Changing the Look of Your Text
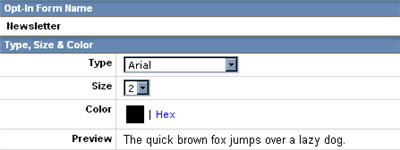
1. To change the font, click the Type box, and then select the font you want.

2. To change the text size, click the Size box, and then select the size you want.
3. To change the color, click the Color box, and then in the Color chooser window, select the color you want.
4. Click SAVE & CONTINUE.
5. A preview of your form displays. Do one of the following:
![]() To go back and make edits, click BACK.
To go back and make edits, click BACK.
![]() To continue, click SAVE & CONTINUE.
To continue, click SAVE & CONTINUE.
Final Steps
At this point you must decide if you want to use HTML or XHTML for your form.
To choose HTML
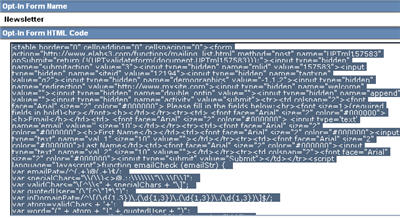
1. Copy the HTML in the Opt-In Form Name section, and then paste it into your web page.

2. Click BACK TO OPT-IN FORMS.
To choose XHTML
1. Click BACK TO OPT-IN FORMS.
2. On the main Opt-In Forms screen, click the Get XHTML command for the form you just created.

3. Do one of the following:
![]() If you are pasting the code into an existing page that already contains the framework for your XHTML (e.g., the DOCTYPE declaration, the body tag), copy the XHTML in the Opt-In Form HXHTML Code section, and then paste it into your web page.
If you are pasting the code into an existing page that already contains the framework for your XHTML (e.g., the DOCTYPE declaration, the body tag), copy the XHTML in the Opt-In Form HXHTML Code section, and then paste it into your web page.
![]() If you want the XML declaration, the DOCTYPE declaration and the body tag added to the code automatically, select Add XHTML DOCTYPE and Body Tags, and then copy the copy the XHTML and paste it into your web page.
If you want the XML declaration, the DOCTYPE declaration and the body tag added to the code automatically, select Add XHTML DOCTYPE and Body Tags, and then copy the copy the XHTML and paste it into your web page.
4. Click BACK TO OPT-IN FORMS.
Note
![]() Your double opt-in and welcome messages can be customized, but the same message is sent to all customers
Your double opt-in and welcome messages can be customized, but the same message is sent to all customers