
To Create a New Domain Limit
Click the
New Domain Connection Limit
Source Field (Options: Domain, Mailstream or IP)
The Source field represents the sending source and is an optional field. You can enter a Domain, Mailstream, or IP. The source field is used if you want to set domain connection limits for a user when sending from an address specified in a mailing, mailstream, or specific IP address.
Domain
You can enter a specific Domain name in the Source field, to set a limit in the Target field.
For example: aol.com
The Domain can be entered as a Domain Macro to create a domain set for managing the domain configuration. See Domain Macro for more information. If left blank the domain default is server wide.
Note: When inserting a domain macro in the Source field, you must include a $ in front of the name for it to process correctly. For example "$domainmacro".
Mailstream
You can enter the name of an existing MailStream in the Source field. You will need to enter the name exactly as it appears in Mailstream Administration, (located at Utilities>Administration,>Mailstreams. The MailStream is a sub group or aggregate of specific internet providers (IPs). You use a MailStream to add a Domain Connection Limit for a group of IP addresses.
Note: If you have three different mailstreams targeted to the same ISPs with different amounts, the one that will send the least amount of mailings will take precedence.
IP
You enter a specific IP Address within an existing MailStream in the Source field.
Target Field (Domain, Domain set or MX)
The target field indicates the receiving target, where messages will be sent. This is a required field. You can enter a Domain, Domain set, or mail exchange server (MX) in the Target field
Domain
You can enter a specific Domain name in the Target field for the messages to be sent to. For example, aol.com
Domain Set
You can enter a specific Domain Set name in the Target field for messages to be sent to a related series of domains. The Domain Set is what is created from a domain macro.
Note: When inserting a domain macro in the Target field, you must include a $ in front of the name for it to process correctly. For example, "$domainmacro".
MX IP
You can enter a mail exchange server (MX) in the Target field.
Throttling Strategy
You can use either Messages per hour or Connections per hour to determine throttling rates. This strategy is referred to as proactive throttling.
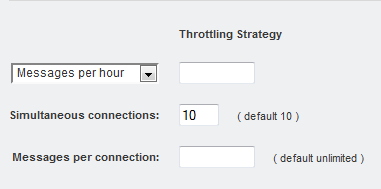
Messages Per Hour
Determines how many messages will be sent in an hour.
Connections Per Hour
Determines how many connections you can make per hour.
Simultaneous Connections:
You enter the connection limit desired.
Note: when entering domain limits, only integers can be entered. You can enter a minimum limit of 1 and a maximum of 100. If you intend to use a setting higher than 10, first ensure that the mail server can handle the load.
This setting works in conjunction with DNS Bypass settings, in case any high volume providers force high volume email via a separate server.
Messages Per Connection
Determines how many messages can be sent on a single connection.
For Example:
You could enter the following settings:
The example above determines that a new connection will be made every five minutes, as in:
This cycle repeats until all messages have been sent. These amounts are approximate. The exact number of messages sent may vary depending on several factors, including the response of the mail server.
Note: if you leave the Messages Per Connections and Connections Per Hour settings blank, the amounts for these settings default to "unlimited".
Utilities: Administration: Server: Server Settings: Network Settings: Relay Hosts
Greylist Backoff Retry Strategy
These settings are used to determine the retry strategy if an ISP has greylisted a send. If nothing is specified, the default settings will be for the target domain. This strategy is referred to as reactive throttling.
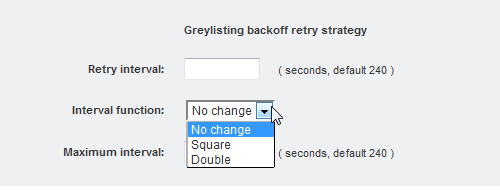
Retry Interval
Enter an integer, in seconds. This is the amount of time the system will wait before attempting to send again. The default is 240 seconds (4 minutes) if the field is blank.
Interval Function
The retry can happen at the same interval, or it can be set to retry at increasing lengths of time, depending on the option selected. The retry interval can be set to double the amount of time between intervals with each attempt or to square the amount of time between intervals.
Square will increase the interval by squaring the initial value. For example, if the retry after that will be 120 seconds.
Double will increase the interval by 2x for each retry. For example, if the retry interval is set to 30 seconds and the option of Double is selected, the next try will be 60 seconds and the retry after that will be 120 seconds.
Maximum Interval
This allows you to enter a maximum time at which to cap the interval retry time, regardless of the interval function option. For example if can be set so retries are no longer than 2 hours. It is recommended that a maximum be set if the interval function is set to double or square in order to prevent the retry interval from becoming very long between retries.
Click the Save button when you are satisfied with your changes. This will take you back to the Domain Connections Limits page.
In order to create a edit a domain macro, click on the Domain Macro button in the upper right hand corner of the page. To learn more about this process click here on Edit Domain Macro.