Setting Up and Using DKIM
DomainKeys Identified mail (DKIM) is an email authentication system which expands on the DomainKeys standard, which was originally created in part by Yahoo. It gives ISPs and email receivers a mechanism for verifying the domain of each email sender, as well as a way to tell whether the message was altered during transit. Additionally, signing your mail with DKIM allows many ISPs to track the reputation of your signing domain, allowing you better control over your deliverability.
The following are the basic steps required when setting up and using DKIM. The steps are explained in more detail in the following sections.
New/Edit Site Configuration
1. Go to Utilities: Administration: sites: Edit/New Site and select the DKIM tab.
2. Select the options you want in the DKIM tab for a specific site. This includes generating public and private keys, which are essential to the operation of DKIM.
3. Create and publish the domain TXT records (this includes publishing the public key to DNS).
4. When you send email, the private key generates a digital signature of the message.
5. The DKIM-enabled receiving server extracts the digital signature and claimed From: or Sender: domain from the headers.
Details
Selecting Options in the Utilities: Administration: Sites: Edit/New Site: DKIM Tab
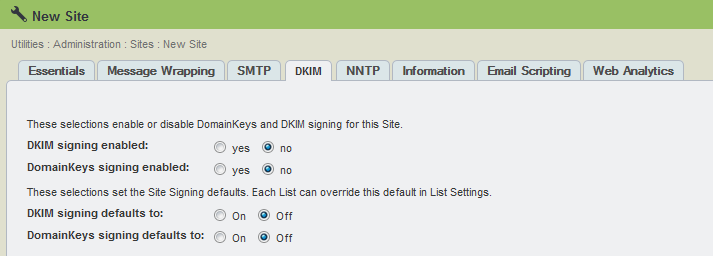
To enable DKIM and/or DomainKeys signing
NOTE This number determines the size (in bits) of the private key. You can choose one of five sizes: 512, 758, 1024, 1536 or 2048. The larger sizes offer greater security, but this is offset by a penalty in CPU performance. The current best practice size is 1024.
To generate the public and private keys
1. Click the Generate Key button. The private key and public key appear in the Private Key and Public Key boxes.
NOTE This procedure runs a program called openssl.exe in the background. You can also generate public and private keys by running openssl.exe outside of ListManager. If you have existing public and private keys and don't need to generate them in ListManager, select the Paste Your Key option, and then paste your keys into the appropriate boxes.
2. To save your work and return to the main Site page, click the Save button.
NOTE For validation to be successful, you must first create and publish the domain TXT records (see the following section).
Creating and Publishing the Domain TXT Record
You must create the Domain TXT Records which you will publish to DNS. Use your favorite text editor to create the records described below. You will then copy the text from the editor into whichever program you use to publish to DNS.
How to Publish Your Public Key on our DNS
The selector record holds your public key. You can set up multiple selectors to be used on different servers if you like, or you can use one selector for all your outgoing email. You can also create a selector that only works for one specific email address. Here is an example selector record:
2006._domainkey.example.com IN TXT "k=rsa; p=MFwwDQYJKoZIhvcNAQEBBQADSwAwSAJBANtlhE1vNuUrz NPKjYblYUn0kBLgRzUbnZ9JCJe4w5/ocxIoeewlp328b20S2tETjIa4krj8OJ1lJFT8VhAHLmcCAwEAAQ=="
The selector record consists of the following three sections:
1. Selector: In this example, 2006 is the selector. It must always be followed by a dot, then an underscore, then the word "domainkey," then another dot, and then the domain name.
Example:
2006._domainkey.example.com
2. Record identifier: "IN TXT" is the record identifier, and it is the same for every record.
3. Tag=value pairs: Note that this section is enclosed in quotation marks. There is only one tag=value pair that must be included—the one that lists the public key. However, there are several other tag=value pairs that are optional. The example above contains this optional pair:
k=rsa
RSA is an algorithm for public-key encryption.
Note When copying and pasting the Public Key, the Public Key must not have carriage returns in the syntax.
Learn more about DomainKey Distribution Options
Validation
1. From Utilities : Administration : Sites: Advanced Configuration click the Validate Key button.
2. If the Validate Key is grey, click save and configure at the bottom so you can select the domain you want to validate.
Should you get a failure, verify that sufficient time has passed to allow your new DNS entries to propagate. This can take up to 48 hours depending on the DNS provider, but is commonly much faster
3. Test that your messages are being signed by sending a message to yourself (at a domain that validates DKIM) so you can view the headers.
Gmail, Outlook, and Yahoo will all validate DKIM, but it is easiest to view the authentication results in Gmail.
Setting up DKIM/DomainKeys at the List Level
DKIM/DomainKeys is set up in ListManager at both the Site and List level. The Selector and Private Key must be populated at the Site level for any DKIM activity to take place. If these fields are not populated, the List level setting for DKIM will be disabled. If the List level settings for DKIM are set and then disabled, the List will continue to attempt to use DKIM signing even with invalid or missing Selectors or Private Keys.
All Lists default to "Use the site setting for this list" for their DomainKeys setting. This means that as soon as the Site level DomainKeys settings are in place, every list under that Site will begin to use DomainKeys signing if the Site "DomainKey Signatures" is set to Yes. If it is set to No, none of the Lists will use DomainKeys signing until their DomainKeys setting is changed.
After you have validated the public and private keys, you can turn on DKIM signing.
Choosing List Level Settings
You can enable DomainKeys at the list level, and specify whether this setting acts in conjunction with the site level setting or independent of it.
1. In the left Navigation bar, go to Utilities : List Settings: Basic Information.
2. Click on the Enable Features tab.
3. Next to DKIM Signing, there is a drop down box. Click the arrow to view the available options:
4. Next to DomainKey signing, there is a drop down box. Click the arrow to view the available options:
Note the DKIM signing and DomainKey signing at the list level is only enabled if it is enabled at the Site level. This is dependent on the yes or no setting you choose in the Utilities: Administration: Sites: New/Edit Site: DKIM tab. Otherwise the drop downs are greyed out.
5. Next to the Third Party DomainKey signing, there is a drop down box. Select On or Off to enable.
6. Click Save.
Using the Header Field
The Header field lets you assign specific headers to be included in the digital signature. Why would you want to do this? There is evidence to suggest that some mail servers and relay systems modify email in transit. If this occurs, it is possible that the email could fail verification. When you include headers in the Header field, they cannot be altered. This provides an extra level of security.
However, the risk of alteration is low and we recommend that you keep things simple by leaving this field blank. When you do, ListManager automatically includes a single header: the Sender header, if present; otherwise, the From header. This approach seems to work fine for most of our users. Some users choose to include crucial pieces of information that their systems rely on for further processing, such as the Message-ID or a marketing campaign ID code. When you assign headers, ListManager still automatically includes the Sender or From header.
The contents of the Header field in a received email can be seen in the DomainKey-Signature header as the "h" tag/value pair. In the example below, this is displayed as:
h=Date:Message-ID:From:To:Subject:MIME-Version:Reply-To:Content-type;